
TL;DR
Placing your rig in a closet reduces noise leaks and reflections. The key is sealing leaks, managing heat with ventilation, and using absorption strategically—foam alone isn’t enough.
Ever tried recording in a tiny closet and wondered why it still sounds hollow or why your neighbors complain? The truth is, closet rigs are great for controlling echoes but terrible for soundproofing. The real win isn’t just slapping foam on the walls—it’s about smart placement, sealing leaks, and managing heat.
In this guide, you’ll learn how to turn a cramped closet into a quiet, effective recording space without breaking the bank or making permanent changes. Whether you want better vocals, fewer echoes, or less noise leaking out, these tips will make your closet work harder for you.
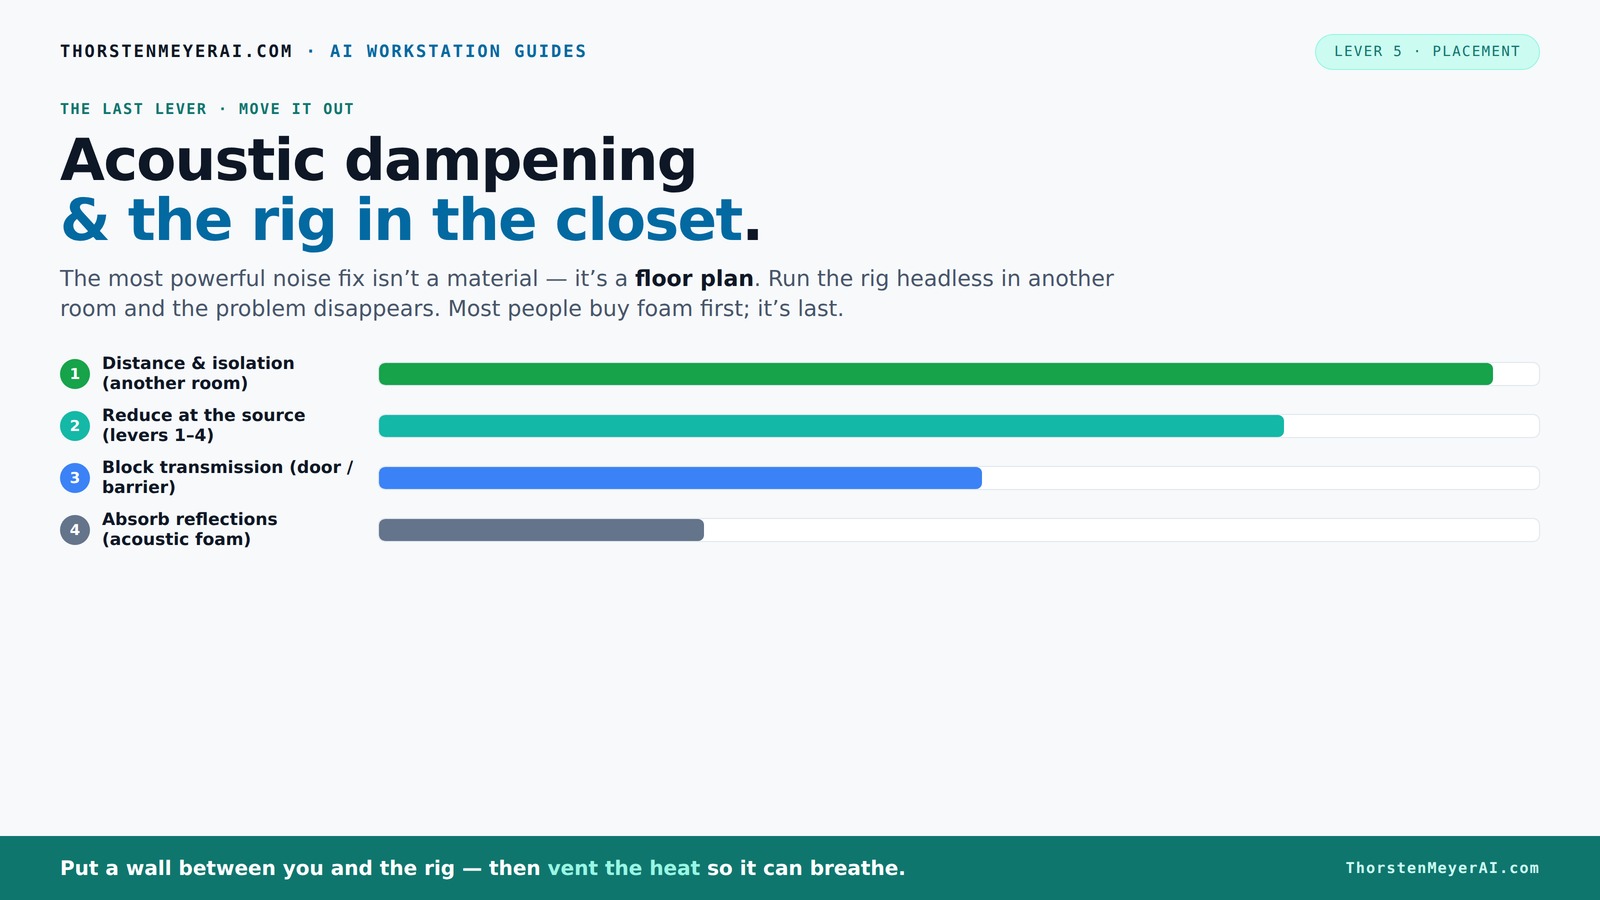
Acoustic dampening
& the rig in the closet.
The most powerful noise fix isn’t a material — it’s a floor plan. A rig you can’t hear because it’s in another room beats any amount of foam. Tap the approaches in Part 1 to see what actually works.
(another room)
(levers 1–4)
(door / barrier)
(acoustic foam)
Contain the noise, not the heat
Key Takeaways
- Sealing gaps and cracks around doors and vents is the most impactful step for reducing noise leaks.
- Placement of mic and speakers should prioritize reflection points and avoid direct contact with reflective surfaces.
- Absorption materials like panels and blankets improve sound quality but won’t stop sound from escaping—combine with sealing for best results.
- Bass traps help control low frequencies and prevent muddiness, especially in small spaces with standing waves.
- Ventilation is essential—use quiet fans or ducting to keep your rig cool without adding noise.

24 Pack Black 12 x 12 x 2 Inches Pyramid Designed Acoustic Foam Panels, Sound Proof Foam Panels for Walls, High Density and Flame-Retardant Acoustic Panels, Sound Panels for Recording and Home Studio
Exceptional Sound Absorption:These pyramid acoustic panels are engineered to effectively absorb sound waves, reducing echo and reverberation. With...
As an affiliate, we earn on qualifying purchases.
As an affiliate, we earn on qualifying purchases.
Why Your Closet Isn’t a Perfect Soundproof Fortress (And What It Is Good For)
Closets excel at absorbing sound reflections—making your recordings less echoey. But they’re terrible at stopping sound from leaking out. Think of them as echo chambers rather than soundproof rooms.
For example, a small closet filled with clothes and thick blankets can soften your voice and reduce reverb. But that same closet will still leak noise through gaps, cracks, or the door. The key is knowing what your space does well and what it doesn’t.
According to soundproofing experts, the biggest weakness is openings—doors, cracks, or vents. Sealing those gaps is often more effective than adding foam, which mostly just controls internal reflections.
Understanding this helps you set realistic expectations. If your goal is complete soundproofing, a closet alone won't suffice without significant modifications. However, for reducing echoes and internal reflections, it’s excellent. The tradeoff is that sealing gaps is often more labor-intensive but yields much better results in containment than relying on absorption alone.

Portable Recording Booth for Home Studio, Foldable Sound Isolation Vocal Shield with Floor Stand, High-Density Acoustic Blanket Enclosure for Singing, Voiceover & Podcast, Includes Phone Holder
INSTANT STUDIO-QUALITY "DRY" SOUND: Transform any noisy room into a professional vocal booth instantly. Engineered with high-density acoustic...
As an affiliate, we earn on qualifying purchases.
As an affiliate, we earn on qualifying purchases.
The First Step: Seal Every Leak—Gaps, Cracks, and Doors
The most effective way to stop sound from escaping your closet is sealing off every opening. Gaps around the door, vents, or even tiny cracks can let your sound leak into neighboring rooms. If these leaks aren’t addressed, all the internal acoustic treatments become less effective because sound can escape or enter through these weak points.
Sealing leaks isn't just about stopping noise; it also improves the overall acoustic environment inside the closet by preventing sound from bleeding out and reducing external noise intrusion. Using weatherstripping or acoustic sealant around door frames and vents creates a barrier that significantly reduces sound transmission. For doors, adding a soundproof blanket or a door sweep can drastically cut leakage.
Imagine your closet as a sealed box—when leaks are sealed, the sound is contained, making your internal treatments more effective. Experts say that proper sealing can reduce noise leaks by over 50%, which means less disturbance to neighbors and a cleaner recording environment. This step is foundational because it amplifies the benefits of subsequent treatments like absorption panels.
In essence, sealing leaks is a cost-effective, high-impact step that directly enhances your space’s sound isolation. Skipping this step often results in wasted effort on internal treatments that don’t achieve their full potential due to uncontrolled leaks.

Audimute Soundproofing Acoustic Door Seal Kit - Door Sweep and Seal - (Standard Size)
Includes a Door Seal (3/16" x 1/2" x 25') and a Door Sweep (1/2" x 1.5" x 4').
As an affiliate, we earn on qualifying purchases.
As an affiliate, we earn on qualifying purchases.
Placement Matters: Where Should Your Mic and Speakers Go?
Placement is everything. Position your microphone away from reflective surfaces and close to the sound source. Use the rule of the 'reflection point'—the spot where sound bounces directly into the mic.
For example, if your mic faces the closet door, the sound will bounce back and create a hollow effect. Move it to a corner or angle it slightly away from reflective surfaces.
Similarly, keep speakers or monitors away from walls to prevent sound bouncing back into the mic, creating echo or phase issues. Use a mirror or even a simple hand mirror to spot reflection points and aim your panels accordingly.
In small, tight spaces like closets, even minor adjustments in placement can have a major impact. Position your mic and monitors to minimize reflections—this means avoiding direct facing surfaces and aiming for angles that deflect sound away from sensitive areas. Experimentation is key; sometimes, just angling your mic slightly or moving it a few inches can significantly improve clarity and reduce unwanted echoes. Understanding your space’s acoustics helps you make smarter placement choices that improve sound quality without adding extra treatments.

80 Pack Acoustic Foam Panels,1"X 12" X 12"Sound Proof Foam Panels,High Density Sound Absorbing Panels,Soundproof Wedges Panels for Studio Recording & Office & Home
【Professional Sound Absorbing Properties】Acoustic foams are installed to reduce noise pollution as they remove echoes and background sounds....
As an affiliate, we earn on qualifying purchases.
As an affiliate, we earn on qualifying purchases.
The Power of Absorption: What Materials Actually Help?
Acoustic panels, blankets, and thick fabrics are the real heroes for inside your closet. They absorb sound waves, reducing echo and reverb. Foam panels are popular, but thicker, 4-inch panels work better in small spaces for low-end control.
For example, hanging a 2-inch panel on the wall behind your mic can cut reverberation, but adding a 4-inch panel or bass trap in the corner tackles deeper frequencies. Rugs and thick curtains on the floor and ceiling also help tame flutter echoes.
It’s important to understand that absorption materials primarily improve internal sound quality by reducing internal reflections and reverberations. However, they do little to prevent sound from leaking out of the space because they lack mass and airtight qualities. Over-relying on foam without sealing gaps can give a false sense of soundproofing while still allowing noise to escape. Combining absorption with sealing and adding mass—like installing additional drywall—creates a balanced approach that improves both internal acoustics and containment. This combined strategy ensures your recordings sound clear and are less likely to disturb neighbors.
Check out this practical guide on effective acoustic treatment.
Bass Traps & Low-Frequency Control: Do They Matter in Tiny Closets?
Bass traps are designed to absorb low-frequency energy—think of the deep hum of a GPU or bass-heavy vocals. For more info, see bass trap placement. In tiny spaces, they’re often overlooked, but they can make a big difference. Without bass traps, low frequencies tend to bounce around and create a muddy or boomy sound, especially in small rooms where standing waves are more pronounced. This results in recordings that sound less clear, with some frequencies overly emphasized and others diminished.
Placing bass traps in the corners of your closet is a strategic move because low-frequency energy tends to accumulate there. By absorbing these frequencies, bass traps prevent the buildup of standing waves that cause muddiness and boominess, leading to a more balanced and natural sound. Even small, 4-inch thick traps can significantly reduce low-end issues, making your vocals and instruments sound more precise and less boomy. Properly used, bass traps help achieve a clearer, more professional recording, even in a tiny space where low-frequency issues are typically exaggerated.
Learn more about bass trapping at low-frequency control.
Ventilation and Heat: How to Keep Your Closet Rig Cool Without Noise
Placing a hot, power-hungry rig in a sealed closet isn’t just about sound—it’s about heat. Without proper ventilation, your hardware will overheat, throttling performance and making fans scream. Overheating can also cause hardware failure over time, which is costly and disruptive. The challenge is to maintain a quiet environment while ensuring adequate airflow.
Use active ventilation: a quiet exhaust fan pulling hot air out and cool air in keeps temperatures stable. For example, a 120mm fan running at low rpm can move enough air with less noise, preventing heat buildup. Additionally, ducting can direct airflow efficiently, reducing noise from fans and ensuring hot air is expelled without creating turbulence or rattles.
Consider ducted airflow or even a small intake vent with a filter. For high-performance rigs, a purpose-built soundproof cabinet with temperature control can keep things cool without sacrificing silence. It’s a balancing act—too much airflow can introduce noise, while too little risks overheating. Regular monitoring of temperatures with a simple sensor helps you fine-tune your setup. Proper ventilation strategies preserve your hardware’s longevity and performance while maintaining a quiet environment for recording.
Putting It All Together: Your Step-by-Step Setup Plan
- Seal all gaps around the door and vents to contain noise.
- Position your mic and speakers to avoid reflections—use a mirror for guidance.
- Add absorption panels at reflection points—wall behind the mic and opposite walls.
- Place bass traps in corners if low-frequency issues are present.
- Set up ventilation—active exhaust fans, ducting, or purpose-built soundproof cabinets.
- Test and tweak—move panels, adjust mic angles, seal leaks, and monitor temperature.
What’s More Important: Absorption or Isolation?
Absorption materials like foam and blankets improve how your space sounds internally. But they don’t block sound from escaping. For true isolation, you need sealing, mass, and decoupling.
For example, hanging thick curtains inside the closet helps with echo. But sealing the door with weatherstripping and adding a second drywall layer with damping compound can block over 90% of noise leaks. This is because mass and airtight seals prevent sound from passing through walls and openings, effectively containing noise.
Many beginners over-focus on foam, thinking it’s enough. Experts say combining approaches—sealing, mass, and absorption—yields the best results. The tradeoff is that more comprehensive solutions require more effort and sometimes more cost, but they deliver significantly better isolation, making your recordings and environment much more professional.
Frequently Asked Questions
What is the difference between acoustic treatment and soundproofing?
Acoustic treatment improves how sound behaves inside a space by reducing echoes and reflections. Soundproofing, on the other hand, prevents sound from escaping or entering the space by sealing leaks and adding mass. Both are important, but they serve different purposes.
Where should I place acoustic panels in a closet rig?
Place panels at reflection points—behind your mic, opposite walls, and in corners for bass traps. Use a mirror to find these points easily. Covering the ceiling and floor with rugs or blankets also helps reduce flutter echo and improve sound clarity.
Do bass traps matter in a tiny closet?
Yes, especially if your recordings sound boomy or muddy. Bass traps in corners absorb low-frequency buildup, making vocals clearer. Even small rooms benefit from strategic bass trapping, which can reduce standing waves by half or more.
How thick should panels be: 2 inches or 4 inches?
For small closets, 2-inch panels can reduce mid-range reflections, but 4-inch panels are better at controlling bass and low frequencies. Combining different thicknesses creates a more balanced acoustic environment.
Is acoustic foam enough for a closet recording booth?
Not by itself. Foam helps control internal reflections but doesn’t block sound leaks. For effective isolation, combine foam with sealing, mass, and ventilation strategies.
Conclusion
Transforming a closet into a quiet recording space isn't about magic—it's about targeted effort. Seal leaks, position your gear wisely, and add absorption where it counts. The result? Cleaner sound, less noise, and a space that feels more professional.
Remember, a closet isn’t a soundproof studio—but with these tweaks, it can be a surprisingly good one. Your recordings will sound clearer, and your neighbors will thank you.