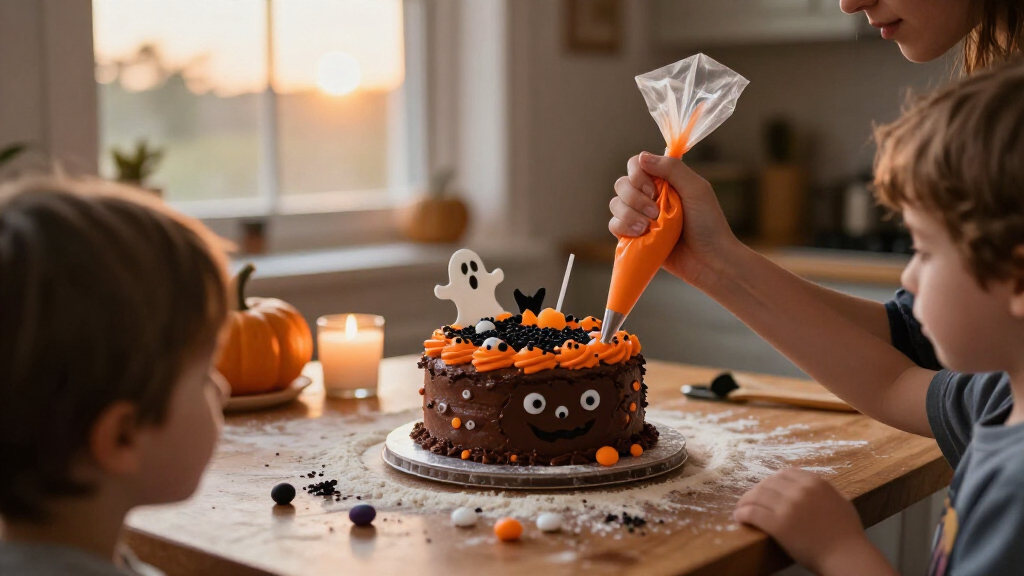
Use a spooky Halloween cake decorating kit to turn a cooled, frosted cake into a themed centerpiece with bats, ghosts, pumpkins, or other decorations. This guide is for beginners assembling a kit and decorating a homemade or store-bought cake; you will finish with decorations securely placed, a tidy presentation, and a cake ready to serve or chill. Allow 1.5-3 hours, including time for a cake to cool if you bake it yourself.

Get kitchen staples and gadgets delivered free — and shop member deals
- Fast, free delivery on millions of items
- Access to Prime Big Deal Days deals on October 6–7
- Prime Video, Amazon Music and more included

Sweets Indeed Halloween Frosting Decorating Kit with Sprinkles
- ✔ Frosting tubes: 3 tubes, 3 oz each
- ✔ Frosting colors: Orange, black, and white
- ✔ Decorating nozzles: 4
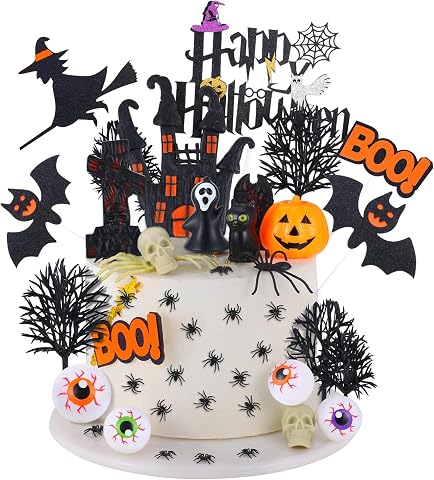
48-Piece Halloween Cake Toppers and Decorations
- ✔ Piece count: 48
- ✔ Materials: Polymer clay, plastic, glitter cardstock, and bamboo
- ✔ Paper weight: 300 g
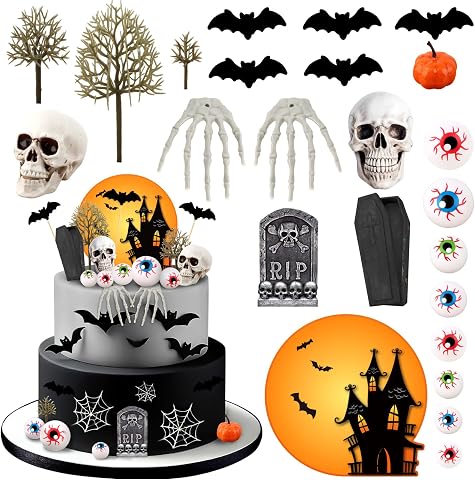
Hooqict 24-Piece Halloween Cake and Cupcake Decorations Set
- ✔ Brand: Hooqict
- ✔ Piece count: 24
- ✔ Materials: Plastic and paper
Difficulty: Beginner | Time: 1.5-3 hours, including cooling and decorating
What You’ll Need
Tools & Materials:
- Halloween cake decorating kit with food-safe decorations
- Cooled cake, homemade or store-bought
- Frosting or icing suitable for the cake
- Cake board or serving plate
- Offset spatula or butter knife
- Small bowls and clean hands or food-safe gloves
- Scissors, if the kit packaging needs to be opened
- Refrigerator space if the frosting or decorations need chilling
Knowledge:
- Basic cake handling and spreading frosting
- Ability to read kit packaging and food labels
Check the kit package for age guidance, allergens, storage instructions, and whether pieces are edible. Some kits include plastic picks, wires, or other non-edible supports. Keep those pieces out of the cake until the decorations are positioned, and remove them before serving. If baking a cake, let it cool completely before frosting; warm cake can melt icing and loosen decorations. Follow package and local food-safety guidance for ingredients that require refrigeration.
Sweets Indeed Halloween Frosting Decorating Kit with Sprinkles
When we want the cake itself to carry the Halloween design, Sweets Indeed is the most complete match in this lineup. It includes three 3-ounce squeeze tubes in orange, black, and white, four decorating nozzles, and a 2-ounce sprinkle mix with candy eyeballs. That combination lets us add piped borders, contrasting accents, and a playful finishing layer without sourcing the main decorating components separately.The squeeze tubes and easy-attach tips make this more approachable than starting with a piping bag and separate supplies. That is especially useful for a family baking session or a child-friendly decorating activity: users can add their own designs, and the candy eyes give even simple frosting a spooky focal point. Compared with either topper set, this option offers more direct control over the cake’s surface, but it requires time and a steady hand. The 48-piece set is a faster route to a busy, theatrical scene, while Hooqict is the simpler display-only alternative.Its drawback is scale. The sprinkle mix is only 2 ounces, so it may not stretch far across a large cake and several dozen cupcakes. The frosting tubes are also finite, and the kit’s three-color palette is festive but narrower than a full decorating pantry. Choose it for hands-on piping and edible finishing; skip it if you want ready-made figures to place quickly or need a substantial supply for a large event.
Pros:
- Includes frosting, four nozzles, and sprinkles rather than toppers alone.
- Three squeeze-tube colors make simple piping accessible to kids and adults.
- Candy eyeballs add an immediately recognizable spooky accent.
- Can decorate cakes, cupcakes, cookies, and brownies.
Cons:
- The 2-ounce sprinkle mix may be insufficient for a large batch.
- The three frosting colors limit the palette compared with using separate icing colors.
Best for: Families, beginner decorators, and hosts who want to pipe Halloween designs onto one cake or a modest batch of treats.
Not ideal for: Buyers decorating many treats who need a larger quantity of sprinkles, or anyone who prefers ready-to-place scene toppers over hands-on piping.
Bottom line: For buyers who want to decorate the cake with frosting rather than only dress it with toppers, this is the strongest all-in-one choice, provided the planned batch is not too large.
“For buyers who want to decorate the cake with frosting rather than only dress it with toppers, this is the strongest all-in-one choice, provided the planned batch is not too large.”
48-Piece Halloween Cake Toppers and Decorations
If the cake should look like a miniature haunted setting, this set offers the most visual variety in the group. Its 48 decorations span classic Halloween motifs, including a castle, trees, spiders, skulls, skeleton hands, tombstones, a specter, a cat, pumpkins, bats, witches, and a BOO sign. A host can combine several pieces into a fuller scene, or spread them across cupcakes rather than relying on a single focal decoration.Compared with Hooqict’s 24-piece assortment, the larger count gives us more options for arranging a coordinated table of treats. The pieces are assembled in advance, which reduces preparation compared with crafting decorations from scratch. Food-grade bamboo sticks are specified for pieces that use them, while the materials also include polymer clay, plastic, and glitter cardstock. That mix can support different shapes and visual effects, but it also means buyers should check what each piece is made from and treat the assortment as decorative rather than assume every component is edible.This set ranks behind Sweets Indeed because it does not include frosting or edible finishing supplies; the cake needs to be iced or decorated separately. Its larger count may also be more than we need for one small cake, and mixed materials can make the set less uniform than a single-style topper kit. Choose it when variety and a crowded, theatrical look matter more than hands-on piping. For a smaller, simpler assortment, Hooqict is easier to scale down.
Pros:
- 48 pieces provide the broadest range of motifs in this comparison.
- Includes distinctive scene elements such as a castle, trees, tombstones, and a specter.
- Pieces are assembled in advance for quicker setup.
- Food-grade bamboo sticks are specified for the relevant decorations.
Cons:
- Does not include frosting, icing, or sprinkles.
- Uses a mix of polymer clay, plastic, glitter cardstock, and bamboo, so materials vary by piece.
- Color appearance may differ slightly from what is shown on a screen.
Best for: Hosts creating a large Halloween cake scene or coordinating decorations across a cake and multiple cupcakes.
Not ideal for: Anyone seeking edible frosting and sprinkles in one package, or a minimalist cake with only a few matching decorations.
Bottom line: Choose this set over Hooqict when the priority is a varied, full Halloween display, but plan to supply the cake’s edible decorating elements separately.
“Choose this set over Hooqict when the priority is a varied, full Halloween display, but plan to supply the cake’s edible decorating elements separately.”
Hooqict 24-Piece Halloween Cake and Cupcake Decorations Set
Hooqict makes sense when we want Halloween decoration without the larger footprint of a 48-piece assortment. Its 24-piece mix includes skeletons, tombstones, pumpkins, bats, skulls, and eyeballs, with sticks and adhesive dots for placement. That gives a cake or cupcake tray a recognizable spooky theme while keeping the selection more contained than the larger topper set.Compared with Sweets Indeed, this is a much faster visual shortcut: there is no piping to learn, but there is also no frosting, sprinkles, or other edible decorating component. Against the 48-piece set, Hooqict offers fewer pieces and a narrower stated list of designs, which may be preferable for a small gathering or a cake where toppers should not dominate. Its plastic-and-paper construction also means it should be treated strictly as decoration. The product specifies that the pieces are not edible and must not go in an oven or microwave.Those restrictions are important when planning assembly. Place the toppers on a finished cake and remove them before serving; do not bake them into a dessert or treat them like edible decorations. The supplied sticks and adhesive dots help with positioning, but buyers still need to provide the cake and any icing. This is the compact, uncomplicated choice for a small display, not the best option for a richly layered scene or a complete decorating activity.
Pros:
- 24 pieces cover several familiar Halloween motifs.
- Includes sticks and adhesive dots to help position the decorations.
- Works across cakes, cupcakes, desserts, and party snacks.
- A smaller assortment than the 48-piece set for less elaborate displays.
Cons:
- Plastic-and-paper decorations are not edible.
- Must not be used in an oven or microwave.
- Provides no frosting, sprinkles, or other edible decorating supplies.
Best for: Buyers decorating a small cake, cupcakes, or party snacks who want a modest assortment of ready-to-place Halloween designs.
Not ideal for: Anyone who needs edible decorations, frosting supplies, a large assortment, or toppers that can be baked into a cake.
Bottom line: Hooqict is a straightforward pick for a small finished-cake display, but buyers should choose the 48-piece set for greater variety or Sweets Indeed for edible decorating supplies.
“Hooqict is a straightforward pick for a small finished-cake display, but buyers should choose the 48-piece set for greater variety or Sweets Indeed for edible decorating supplies.”
As an Amazon Associate we earn from qualifying purchases.
Before You Start
Set aside a clean, level work area and decide where you will serve or store the cake. Check the kit contents against its package image, then confirm each piece is intact and suitable for contact with food. Separate edible pieces from supports or packaging. Plan the design before opening delicate decorations: larger pieces usually go on top, while smaller pieces fill open areas. If the cake is for someone with allergies, inspect both the kit and frosting labels; do not assume decorations are allergen-free.
Step-by-Step Instructions
Step 1: Choose a kit that fits your cake
Match the kit to the cake’s size, shape, and serving plan. Check how many decorations are included, the dimensions of larger toppers, and whether the design is made for a round, square, or sheet cake. Read the ingredient and allergen information, and confirm which pieces are edible. If the package gives a recommended cake size, use a cake close to that size so the decoration layout does not look crowded or sparse.
Tip: For a cake that will travel, favor low-profile decorations that can be secured in frosting and are less likely to shift.
Check: You have a kit with enough pieces for the cake and know which components are edible and which need to be removed before serving.
Step 2: Prepare a stable, fully cooled cake
Place the cake on a level cake board or serving plate. If you baked it, wait until it is completely cool before frosting. If the top is badly domed, level it with a clean serrated knife only if you are comfortable doing so; otherwise, turn the cake so the flatter side faces up. Brush away loose crumbs, and chill a soft or crumbly cake briefly so it is easier to frost.
Tip: Do not decorate a warm cake. Heat can soften frosting, make the surface slide, and cause candy or icing details to melt.
Check: The cake sits flat without rocking, and its surface feels cool rather than warm.
Step 3: Apply a smooth layer of frosting
Spoon frosting onto the top and sides, then spread it with an offset spatula or butter knife. Work from the top outward and use enough frosting to give the decorations a place to stick. A perfectly smooth finish is not required for a spooky design: textured swirls can suit a monster, graveyard, or haunted-house theme. Wipe crumbs from the utensil as needed so they do not streak through the frosting.
Tip: If the frosting is too stiff to spread, let it sit briefly at room temperature and stir it. Do not add liquid unless the frosting instructions allow it.
Check: The cake is covered, the frosting holds its shape, and there are no large bare areas where decorations need to attach.
Step 4: Arrange the design before placing pieces
Lay out the kit decorations beside the cake while keeping them on a clean surface. Place the largest topper visually at the center or toward the back, then group smaller pieces around it. Leave room to cut and serve the cake, and keep tall pieces away from the plate edge. Check the package instructions for assembly order, especially when a design uses multiple parts or supports.
Tip: Take a quick photo of the planned layout if you expect to move pieces around; it gives you a simple reference while decorating.
Check: The design has a clear focal point, smaller decorations fit without crowding, and no piece hangs over the cake edge.
Step 5: Attach decorations without damaging the cake
Press edible decorations gently into the frosting, using only enough pressure to hold them in place. For a topper on a pick or support, insert the support vertically into the cake and follow the kit directions. Keep non-edible supports clearly identifiable and avoid pushing wires, picks, or plastic parts so deep that they disappear. Add flat decorations from the center outward so your hands do not brush against pieces already in place.
Tip: Use clean, dry hands or food-safe gloves. Moisture can make some printed or sugar decorations soften, bleed, or stick together.
Check: Each decoration stays in position when you lightly move the cake board, and all non-edible supports remain visible or easy to locate.
Step 6: Add small details and tidy the presentation
Fill obvious gaps with the remaining small pieces, sprinkles, or frosting details supplied with the kit. Keep the decoration pattern balanced rather than trying to use every piece if the cake begins to look crowded. Remove stray crumbs and wipe frosting from the cake board with a clean, slightly damp cloth. Do not wipe over edible decorations or let water touch moisture-sensitive pieces.
Tip: If sprinkles roll off, press them lightly into the frosting instead of scattering them from high above the cake.
Check: The theme is recognizable, decorations are spaced neatly, and the serving plate has no distracting smears or loose packaging.
Step 7: Store and serve the decorated cake safely
Check the kit and frosting storage directions, then cover or chill the cake as required. Use a cake carrier or a container tall enough that the lid will not touch the decorations. Before serving, tell guests which decorations are not edible and remove picks, wires, or plastic parts from the cake. Keep small hard decorations away from young children, and cut slices with a clean knife without dragging supports into the portions.
Tip: If the cake must travel, chill it until the frosting is firm, then carry it on a flat surface. Avoid placing it in a warm car or stacking items above it.
Check: The finished cake remains stable in storage, and every non-edible support can be found and removed before guests eat it.
Common Mistakes to Avoid
- Frosting a cake while it is still warm. — Let the cake cool completely before applying frosting. Chill it briefly if the surface is soft or crumbly.
- Choosing a kit without checking cake size or decoration dimensions. — Read the package measurements and cake-size guidance before buying or opening the kit. Plan extra space for tall toppers and serving cuts.
- Treating every kit component as edible. — Read the packaging and identify picks, wires, plastic pieces, and other supports. Keep track of them and remove them before serving.
- Pressing decorations too hard or handling them with wet fingers. — Use clean, dry hands and light pressure. Attach pieces to frosting rather than forcing them into the cake.
Troubleshooting
Problem: Decorations slide across the frosting.
Solution: Chill the cake until the frosting firms up, then reposition the pieces gently. If the frosting is very soft, chill it before adding more decorations and avoid moving the cake until set.
Problem: Frosting pulls up crumbs or looks streaky.
Solution: Pause and chill the cake for 10-15 minutes. Apply a thin crumb-coat layer, chill it until firm, then spread the final layer with a clean utensil.
Problem: A topper leans or will not stay upright.
Solution: Check whether its support is assembled as directed, then insert it vertically into a stable part of the cake. If the cake is too soft, chill it first; do not force a damaged support into the cake.
Problem: Printed decorations soften, bleed, or stick together.
Solution: Stop handling them and check the kit’s moisture and storage instructions. Keep them dry, separate them carefully, and add them near serving time if the package recommends that approach.
What Success Looks Like
The cake is level, fully frosted, and decorated with a clear Halloween theme. Decorations stay in place when the cake is moved gently, the presentation is tidy, and the cake has been stored according to the frosting and kit directions. Before serving, all non-edible picks, wires, plastic parts, and packaging are removed or clearly accounted for.
Next Steps
Keep the kit packaging until the cake has been served so you can refer to ingredient, storage, and support-removal details. Store leftovers according to the frosting and cake ingredients, and discard decorations that have been in contact with uneaten cake if their package says not to reuse them. Wash reusable tools and the serving board after use. For another cake, note which kit pieces fit the cake size and which decorations were easiest to place.
Frequently Asked Questions
Can I use a Halloween decorating kit on a store-bought cake?
Yes. Choose a cake with a stable, frosted surface and check that its size suits the kit. If the cake has a very soft topping, chill it briefly before adding decorations so pieces are less likely to slide.
Do all cake decorating kit decorations need to be edible?
No. Kits may include plastic picks, wires, or other decorative supports. Read the package, separate edible pieces from non-edible parts, and remove supports before slicing or serving.
When should I put decorations on the cake?
Add them after the cake is cool and frosted. For moisture-sensitive printed or sugar pieces, follow the package directions; some are best added close to serving time.
How can I keep the cake decorations from falling off during transport?
Chill the frosted cake until the surface firms, secure edible pieces gently in the frosting, and use a level cake carrier with enough headroom. Keep the cake flat during travel and avoid heat.
How do I make sure the cake is safe to serve?
Check allergen and storage information for the cake, frosting, and kit. Remove all non-edible supports, tell guests about any hard decorations, and follow food-storage directions for ingredients that need refrigeration.
Halloween Picks
halloween
As an affiliate, we earn on qualifying purchases.